PHPStorm
Installation
- Visit https://www.jetbrains.com/toolbox/app/
- Hit Download
- Open the folder that was Downloaded. It will be named something like "jetbrains-toolbox-xxxxx"
- Go to Other Locations/AppleImage/AppRun
- Login if you need to otherwise hit Skip
- Under "All tools" find PhoStorm and hit Download.
Auto Updating
Suggest you configure Toolbox to automatically update PHPStorm for you as updates come out.
To do so, simply Click on the "Nut" icon next to PHPstorm to get to settings
Once you are in settings you can tick a box to automatically update.
Tip
In this settings area, you can also increase the amount of RAM offered for PHPStorm. I would suggest increasing this to something like 1500MB
Productivity Boosters
Here are some productivity boosting tips:
Code Generation
Generating code is accurate and fast
Class Contructors
To generate a class constructor that handles all of the allocation of constructor args to class properties, simply do this:
Step One, Create Your Class with Class Properties
for example
<?php declare(strict_types=1);

namespace EdmondsCommerce\Bundle\OscommerceConnectorBundle\File;


class Downloader
{
    /**
     * @var string
     */
    protected
        $url,
        $saveDir,
        $filename;

}
Then simply hit [alt]+[insert] and select "Constructor"
You can then select the class properties you want in the constructor and it generates perfect code like this:
<?php declare(strict_types=1);

namespace EdmondsCommerce\Bundle\OscommerceConnectorBundle\File;


class Downloader
{
    /**
     * @var string
     */
    protected
        $url,
        $saveDir,
        $filename;

    /**
     * Downloader constructor.
     * @param string $url
     * @param string $saveDir
     * @param string $filename
     */
    public function __construct(string $url, string $saveDir, string $filename)
    {
        $this->url = $url;
        $this->saveDir = $saveDir;
        $this->filename = $filename;
    }


}
Keyboard Shortcuts
Intention Actions (aka the little light bulb)
You can 'click' on the Intention Action using ALT + Enter.
Command Line Opening
You need to make sure you create the command line launcher. This should default to /usr/bin/local/pstorm which is fine
Getting Xdebug and Symfony (and maybe other) Frameworks to give you Openable Links for files
Setting Xdebug Config
The standard PHP-FPM_Nginx container asset script runOptional_installXdebug.bash will now correctly configure xdebug to provide openable links
If you are working on a legacy container, you can run this snippet inside the container to update it:
hostnameWithoutDesktop=$(hostname | sed 's/-desktop//')
cat <<END > /etc/php.d/xdebug.ini
zend_extension=/usr/lib64/php/modules/xdebug.so
xdebug.remote_enable=1
xdebug.max_nesting_level = 2000
xdebug.file_link_format="phpstorm://open?file=/var/lib/lxc/$hostnameWithoutDesktop/rootfs/%f&line=%l"
END
Setting Up XDG Handler
You then need to set up the handler for phpstorm:// with xdg-open
Firstly, you should get a shell script to handle this
cd ~
mkdir -p bin
cd bin
wget https://raw.githubusercontent.com/sanduhrs/phpstorm-url-handler/master/phpstorm-url-handler
chmod u+x phpstorm-url-handler
Now we need to configure xdg to use this script when opening the phpstorm:// links
First get the desktop file and install it
cd ~
wget https://raw.githubusercontent.com/sanduhrs/phpstorm-url-handler/master/phpstorm-url-handler.desktop
sudo desktop-file-install phpstorm-url-handler.desktop
sudo update-desktop-database
And that should be it
Debugging This
If it doesn't work and you need to debug it then it's quite simple:
- Make sure your gnome terminal is configured to stay open on command completion (profile preference -> command)
- Change the desktop file to change
Terminal=falsetoTerminal=true - Add a
set -xto the top of your~/bin/phpstorm-url-handler
Then if you click on the link, you should get a terminal opened with the full debug info. Gnome terminal helpfully obscures the first line with a big blue bar, but you can select all and copy paste this into gedit to see the full output
Plugins
Here are some must have plugins
Must Haves
Magicento
Magento development extension for much boosted productivity
- Binding (Alt+M) conflict fix for when M1 and M2 are installed
Bash Support
Proper syntax highlighting and basic IDE functoinality for BASH scripts
https://plugins.jetbrains.com/plugin/4230-bashsupport
Suggested
String Manipulation
Nice tools for easily converting strings
https://plugins.jetbrains.com/plugin/2162-string-manipulation
Regex Support
Nice syntax highlighting when working with regex functions
It's far from perfect but better than default
https://plugins.jetbrains.com/plugin/7746-php-regexp-support
Configuration
Open a project in PHPStorm
- Go to File -> Open
- Select the path to the container and site e.g. /var/lib/lxc/[container-name]/rootfs/var/www/vhosts/[site-name]
- Press OK
Setting the PHP version
- Go to File > Settings
- Open Languages and Frameworks > PHP
- Choose the appropriate PHP Language Level
Use a container's PHP interpreter
- Go to PHPStorm Configuration -> Languages and Frameworks -> PHP
- On this page there is a dropdown for the available interpreters, hit the ellipsis (...) next to the CLI interpreter dropdown
- Click the green add icon (+) and choose "Remote".
- Choose SSH Credentials
- Fill in the form:
Redacted
Xdebug
Configuring Xdebug in PHPStorm
Redacted
XDebug Container Install
lxc-attach {container-name}.cd /home/ec/PHP-FPM_Nginx_Install/&sudo bash ./runOptional_installXdebug.bashto complete xdebug setup for container.
Run xdebug in terminal by typing
lxc-xdebug {container-name}
Click the ![]() phone icon in the right top corner in PhpStorm
phone icon in the right top corner in PhpStorm
Enable debugging in your browser and refresh the page.
Redacted
Using xdebug in PHPStorm
Note
Xdebug concepts are explained in the PHP Debugging page
Setting breakpoints and stepping through
To add breakpoints:
- Click the area immediately to the left of the line of code you want to break at, just to the right of the line number itself
- Run your code and wait for it to pause on that line
- You can then inspect variables' values and check the state of the code without it resuming
To step through your code when on a breakpoint:
 Step Over (F8) to move the execution to the next line
 Step Into (F7) to enter the function about to be called, if the current line is on a function/method call
 Step Out (Shift+F8) of the function you're in to go to where the function was called
 Resume (F9) to continue execution to the next breakpoint
 Stop (Ctrl+F2) to stop execution of the code
Adding watches
- Highlight the variable or function call you want to see the value of
- Right-click the highlighted code
- Click "Add to Watches"
- Inspect its value in the debugger's Watches panel
Evaluate Expression
This is like a watch, but used as a one-time thing rather than keeping an eye on it as you step through
- Highlight the variable or function call you want to see the value of
- Right-click the highlighted code
- Click "Evaluate Expression"
- Click "Evaluate", and you'll see its output in the window
PHP Quality Assurance
In this section we are documenting how to best use PHPStorm functionality and extensions to assist and automated writing code that conforms to our standards.
PHP Coding Standards
There are a multitude of coding standards out there. Rather than reinvent the wheel, we use platform defaults, falling back to PSR2 as required.
PHP Code Sniffer
Proceed with configuring container interpreter before proceeding the steps below.
Go to your project root, and alter composer.json file with the following data
"require": {
    "squizlabs/php_codesniffer": "^2.0@dev"
},
- Run
composer updatein your terminal which will pull the required files. - Go to File -> Settings -> Language & Frameworks -> PHP -> Code Sniffer
- Select correct interpreter and click on "..." button.
- Include correct path for phpcs file, which should be under
vendor/binin your project root - Click validate to be sure that everything is mapped correctly.
Coding standard
- Go to File -> Settings -> Editor -> Inespections
- Search for PHP Sniffer Code Validation
- Select coding standard from the drop down.
- Select error severity level
For example if you want to use Symfony2 Coding Standards, you will need to pull another dependency
by adding the code below to your composer.json and run composer update
 "require-dev": {
        "escapestudios/symfony2-coding-standard": "~2.0",
    },
Code Sniffer (PHP 7.2)
- Go to the vhosts folder
cd /var/www/vhosts - You need to be sudo
sudo bash - Create folder for the code sniffer
mkdir codeSniffer - CD into the code sniffer folder
cd codeSniffer - Give ownership to
ecuser
chown ec:ec . - Logout from sudo
exit - Clone the code sniffer repo
git clone https://github.com/squizlabs/PHP_CodeSniffer.git . - Use composer to install the project
composer install - Add
php-compatibilityto composer
vim composer.json
"require-dev": { "phpcompatibility/php-compatibility": "*" }, - Exit and save vim
:x - Run composer update
composer update - Config phpcs to use php-compatibility
bin/phpcs --config-set installed_paths vendor/phpcompatibility/php-compatibility - Create the directories file which contains the paths to the project folders
vim directories.txt
/var/www/vhosts/<project_name>/public/app/code/community/ /var/www/vhosts/<project_name>/public/app/code/local/ /var/www/vhosts/<project_name>/public/app/design/frontend/rwd/<your_theme>/template/ /var/www/vhosts/<project_name>/public/app/design/frontend/base/default/template/ /var/www/vhosts/<project_name>/public/shell/ - Exit and save vim
:x - Run the code sniffer
bin/phpcs --standard=PHPCompatibility --runtime-set testVersion 7.2 --file-list=directories.txt -p --report-full=./compact_report.txt --ignore="$(cat ignore_files.txt | tr '\n' ',' | sed 's/,$//')"
PHP Mess Detector
Copy-Paste Detector
Syncing PhpStorm folder
If you know that some files should be in the folder, but it's not. You need to right click the folder in PhpStorm and "Synchronize"
Testing
PHPUnit
To setup PHPUnit, you need to have container interpreter already setup. And have composer PHPUnit dependency pulled.
Put this inside composer.json file
"require-dev": {
    "phpunit/phpunit": "~5.7"
},
- Go to File -> Settings -> Languages & Frameworks -> PHP -> Test Frameworks
- Click green + and sellect PHPUnit remote interpreter, and select the container interpreter from the list. See Use a container's PHP interpreter.
- Select use composer autoloader
- Click on "..." button and inside your remote server browse for
/var/www/vhosts/{project-name}/vendor/autoload.php - Default Configuration file
/var/www/vhosts/{project-name}/phpunit.xml - Untick Default bootstrap file if it's ticked
- That's it, you now can run test files by right clicking and pressing "Run {testname}"
Behat
Configure the remote PHP interpreter
The following allows the use of PHPStorm's inbuilt tools, including running
- Go to File -> Settings -> Language & Frameworks -> PHP
- Click ... after CLI interpreter input
- Click green + to add Remote
- Insert host
and port 9516 - Insert username: ec
- Insert password: XXXXX
- Insert host
- Click ... after Path mappings
- Click green +
- Insert local path eg.: /opt/Projects/"project-root"
- Remote path eg.: /var/www/vhosts/"project-root"
- Click green +
Configuring Test Frameworks
- Go to File -> Setting -> Language & Frameworks -> PHP -> Test Frameworks
- Click green + to add Behat by Remote Interpreter
- Click ... after Path mappings
- Click green +
- Insert local path eg.: /opt/Projects/"project-root"
- Remote path eg.: /var/www/vhosts/"project-root"
- Click green +
- Click ... after Behat executable
- Insert path to behat file eg.: /var/www/"project-root"/vendor/bin/behat/
- Click ... after Test Runner and be sure to tick to box
- Insert path to behat.yaml file eg.: /var/www/"project-root"/vendor/behat.yaml
Syntax Highlighting Heredoc
If you are working with heredocs in other languages, PHPStorm can highlight these for you, however you may need to update the configuration.
To do this open the settings menu <Ctrl> + <Alt> + sand search for Language Injections. When this comes up, look at what comes by default, and if needed add a new injection.
This can be done by clicking the + button, or pressing <Alt> + <Insert>, selecting Generic PHP and then filling in the settings like so
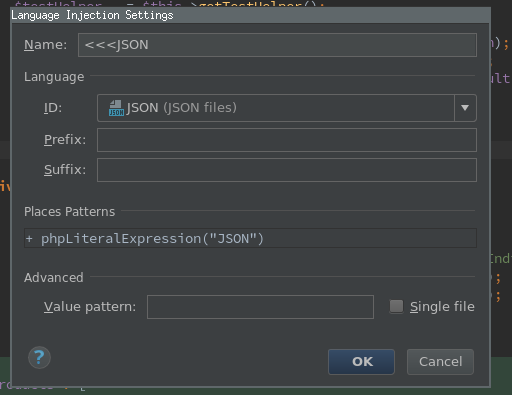
Save the new injection and you will then have the code properly highlighted, inspected, and error checked
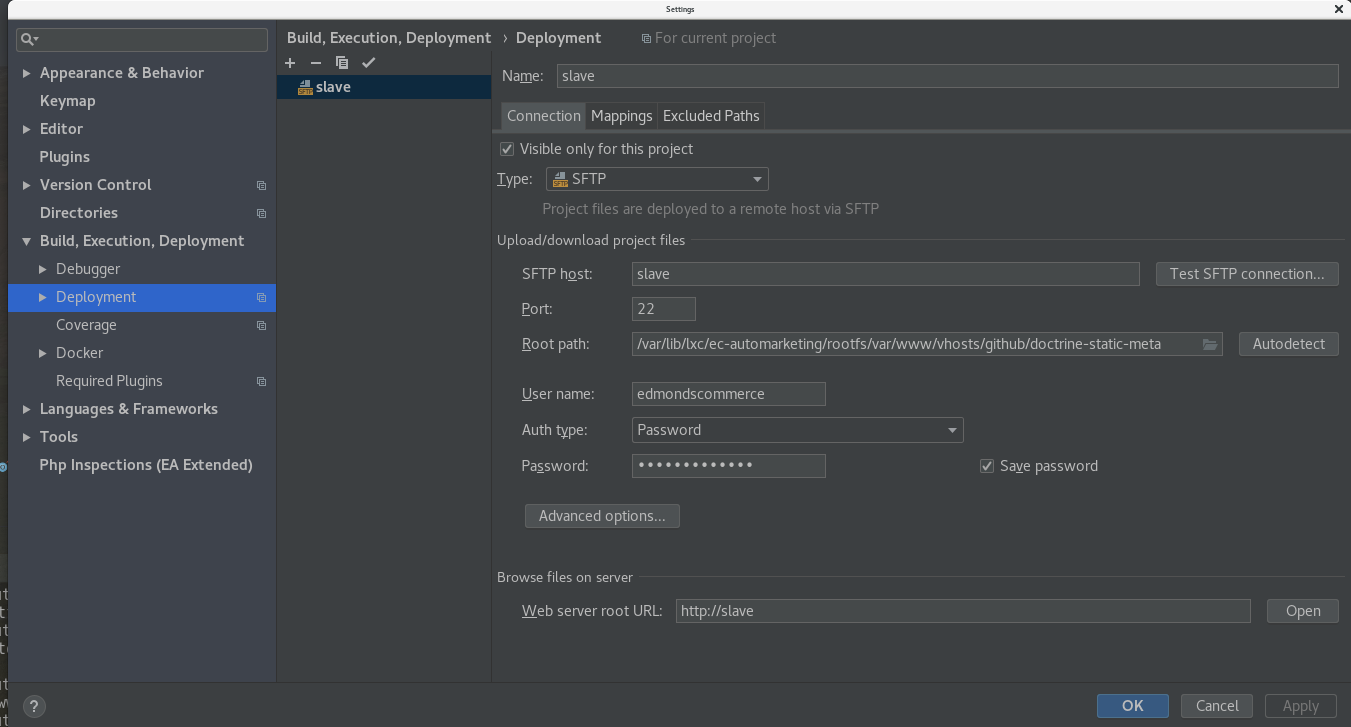
Using a Slave Server
You might want to develop locally but push your changes up to a slave server for testing purposes.
The correct way to do this is to use a PHPStorm Deployment configuration.
Configuring Deployment
First open the settings and search for deployments. Then create a new SFTP deployment configuration such as:
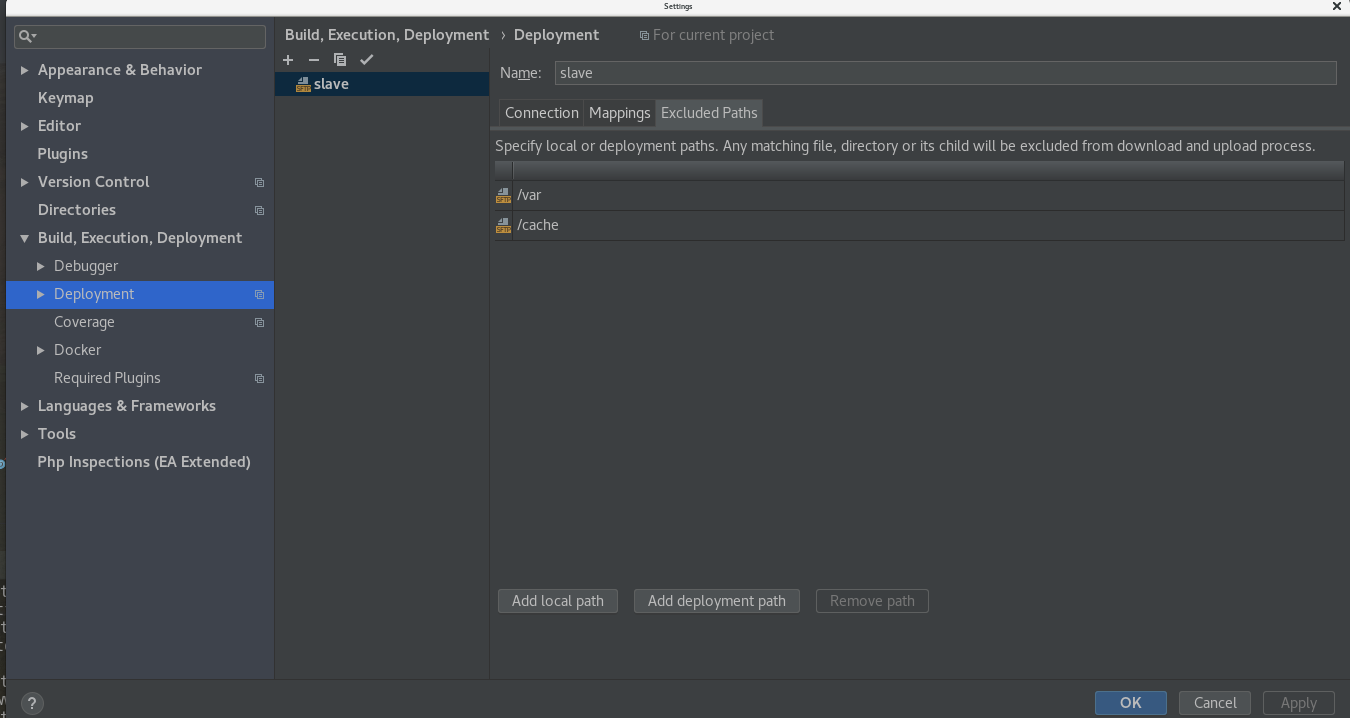
You will also want to set up mappings. The local path is your full local filesystem path from your host, so starting with /var/lib/lxc/container-name/rootfs/
The remote path is almost certainly /
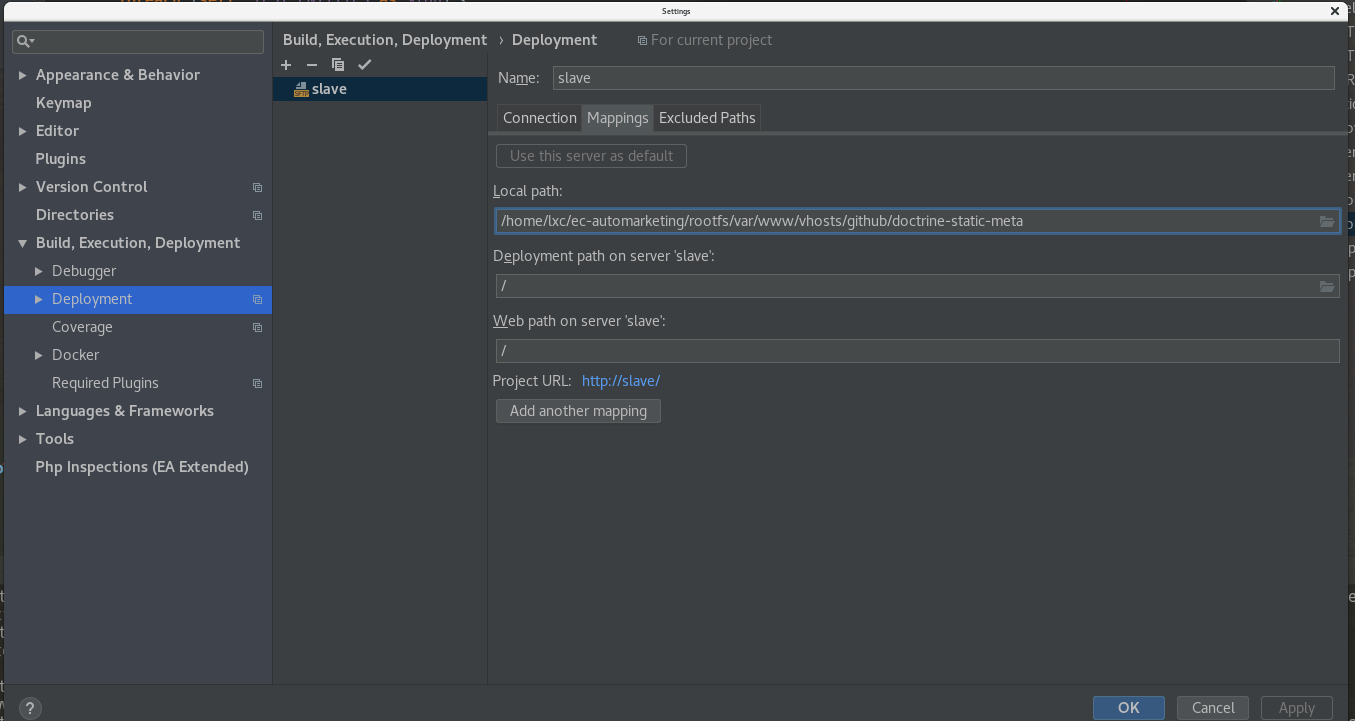
Finally, you probably want to ignore some directories. The way that works and is easiest is to [Add deployment path] which are then relative to the deployment root directory.
Automatic Deployment
You can configure PHPSTorm to automatically deploy changes as they happes.
To do this, in the main navigation, go to Tools -> Deployment and click to Automatic Deployment
You can also open the Options from this menu and suggested config is:

Deploying Specific File/Folder
To deploy a specific file or folder, simply right click it and select the deployment options.
Configuration
Make sure you are on the latest PHP Storm version using the toolbox (set it to auto-upgrade)
Use the internal config.
cd /tmp; git clone https://github.com/edmondscommerce/phpstormConfig.git --depth=1; cp -r phpstormConfig/* ~/.PhpStorm2018.3/config/
Configuration troubleshooting
In case you forget to import old settings on upgrade
- Close IDE
- Backup and delete your WHOLE "/home/user/.PhpStorm2018.2" folder
- Start IDE (2018.2 version)
- Since there is no settings for 2018.2 available (we've deleted them)... IDE will automatically offer to import them from 2018.1 (or whatever other older version settings are there)
- Allow that -- it will copy all needed files