Client Handbooks
MKDocs ContainerAsset
The Client Documentation should be created based on Cluster/containerAssets/mkDocs/ in the Snippets Library. This is created as part of the Client Jira setup.
It should he hosted on the client's Jira container at /var/www/vhosts/mkdocs
For Containers missing the mkDocs asset
Because some Jira containers were set up before the mkDocs process was added, they'll need it adding retroactively.
- SSH to the cluster machine:
ssh cluster2 - Run the omitted script:
1bash /opt/Projects/snippets-edmondscommerce/Cluster/shellscripts/cluster/setupPublicFacingContainers/setupClientJira/_04_docs.bash <clientname>
Creating client docs bitbucket repo
Login as client to bitbucket.org and follow this create repo link
Make it private repository and give it a name of client-docs.
Note
Don't forget to give edmondscommerce user acccess in the bitbucket by going your client-docs repo
Settings page -> User and group access -> enter username edmondscommerce and give Admin permission.
Setting up the Post Receive Hook
To create a post receive hook for pushing to BitBucket and also to trigger a handbook build, you should locate the bare repo folder in gitBareRepos, in there is a folder called hooks
Before we can add in the handbook build, you need to make sure that the ssh key for gitBare has been copied into the mkdocs container. Run the following command and Change "CONTAINER_IP" with the
IP address of the container that has the client docs on it (usually the Jira container). You can ssh into the container with sshContainer "container_name" .
ssh-copy-id CONTAINER_IP -p9516
Note
If you are doing this for a specific client handbook you will need to find the repo and then edit the post-receive file within the client repo itself on the gitBareRepos container.
In that folder we need a file called post-receive. It needs to have the correct permissions so to do this quickly you can run the following 2 commands touch post-receive which creates the file and then chmod 755 to change the permissions. To edit the file enter the following command vim post-receive which the file needs to have content like this:
#!/usr/bin/env bash

echo "Kicking off a backgrounded bitbucket sync and handbook build..."

bash /home/ec/post-receive-hooks/bitbucket-sync.bash "git@bitbucket.org:SLUG/HERE.git"

bash /home/ec/post-receive-hooks/handbook-build.bash "CONTAINER_IP_HERE"
The container IP is for the container that is hosting the client docs.
Note
To get the "slug/here" part of the 1st command, you will need to go onto bitbucket and get it. You can do this by looking at the "I have an existing project" drop down on a new repo or next to SSH on the overview page. To get the "CONTAINER_IP_HERE" All you need to do for this is ssh into the the required container and use one of the following commands
ip a or hostname -i
Once you have it all working, if you want it to be backgrounded so you get your prompt back as quickly as possible, you can set the hook to be this:
echo "Kicking off a backgrounded bitbucket sync and handbook build..."

nohup bash /home/ec/post-receive-hooks/bitbucket-sync.bash "git@bitbucket.org:SLUG/HERE.git" &> /dev/null &

nohup bash /home/ec/post-receive-hooks/handbook-build.bash "CONTAINER_IP_HERE" &> /dev/null &
Editing Client Handbook
Note: Going forward, replace CLIENTNAME with the abbreviation that has been given to the client's container.
For example, ec = Edmonds Commerce.
To edit the client handbook, start by cloning the client's Jira container down from Cluster 2.
If you need to find the name of the container to clone, do container_list.
Go into the terminal and do cluster2_Clone CLIENTNAME-jira.
When the container is cloned, attach it by doing lxc-attach CLIENTNAME-jira.
Now head into Pycharm and click "File" and "Open" on the top navigation bar.
In the new window that opens up, enter /var/lib/lxc/CLIENTNAME-Jira/rootfs/var/www/vhosts/mkdocs
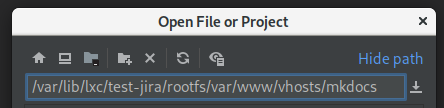
Clicking "Ok" will then open the jira mkdocs container's directory.
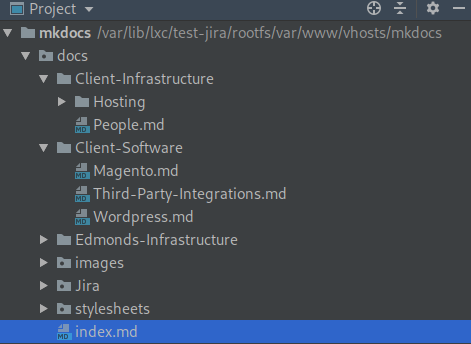
In the right hand side of Pycharm, expand the mkdocs directory, and then the docs directory.
You'll be able to see the different categories for the docs as well as the individual pages in each, saved as a
markdown file (.md).
You can now either start editing the existing pages, or start to add new ones (if required).
Updating Client Handbook
When we make a Jira instance for a new Client, a "Client Handbook" for their company/site is make automatically.
Note: If there is a client who does'nt want Jira, then start creating a Jira instance using these instructions
but stop after you've made the Jira container.
DO NOT carry on with the Jira set up, Once you get to "Setting up the Jira database", return to these instrucitons.
The landing page for each client handbook is the same blank, default Edmonds Commerce landing page, and there is no
information on any of the pages.
We need to edit these so that they reflect the client's company/site instead.
Editing Landing Page
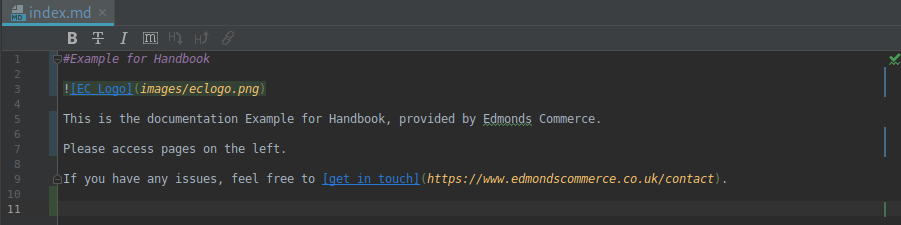
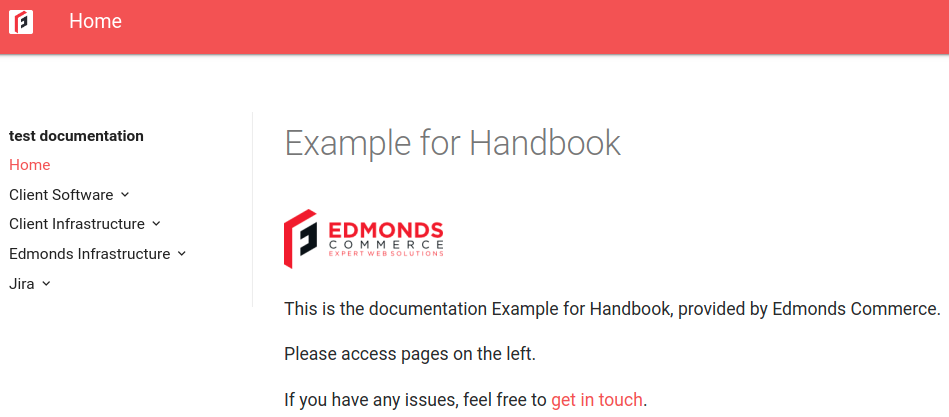
After attaching the container for the Jira and opening the correct file path in Pycharm, double click the "index.md" file to open and start editing it. This file is the landing page for the client docs.

We want to display the company's name and logo here, as well as stating that this is the documentation for the specific client. Below is what the landing page looks like by default in Pycharm:

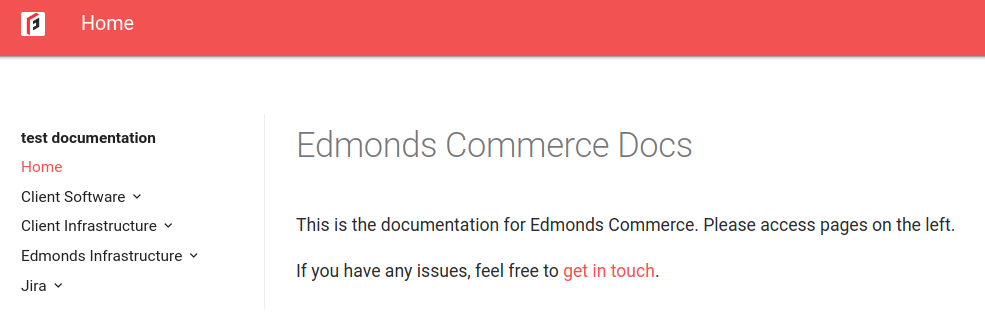
Below is how it looks in the browser:
To make this look more client centric, start by editing the title so it says the client's name instead of Edmonds Commerce in Pycharm.
Then, edit the first line so it reads "This is the documentation for CLIENTNAME, provided by Edmonds Commerce. Please access pages on the left".
We now want to add the company/website's logo to this page.
Google the logo and save the image locally and then make sure you add it to the "images" folder used for this handbook. For assistance, see the
"Using Pictures" page.
Since this in an example, I'll add the Edmonds Commerce logo.
Your page in Pycharm should look something like this.
Push these changes up and then head over to the terminal and ssh into the container again.
Navigate to the docs directory by doing cd ../../var/www/vhosts/mkdocs/docs.
When in there, do a git pull to pull down the changes we've just pushed and then docsBuild to apply these changes to
the live version of the docs.
The live docs page in the browser will now display what you did in Pycharm.
Deleting Patching Checklist
Since we keep track of all the patches using a google sheet, this checklist is no longer needed.
Simply open the "Magento" page in Pycharm under the "Client Software" folder and delete from "Patches Applied" down to
where the table ends.
You can also take this opportunity to fill out the information on this page, such as the Magento version for the client's site, the theme they use and any third party or custom functionality they have installed.
Updating the People Page
The people page is a great way to quickly find out the important client contacts and main point of contact for the work.
Follow this link here to see an example of this page.
In Pycharm, simply open the "People" page under the "Client Infrastructure" folder on the right to start editing.
Simply enter the details as requested, and copy and past these points if there are multiple points of contact.
Below is an example of this for the admin team here at EC.
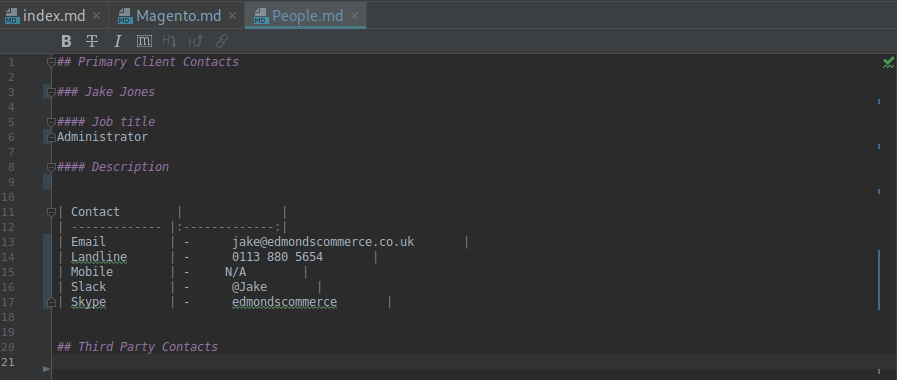
Third party contacts refer to people outside of the client who are relevant to contact, such as hosting providers or parent companies.
When all the people are added, push the changes and then git pull and docsBuild again after sshing back into the container like we
did when editing the landing page.
Further editing of pages
Now that you know how to edit these, you can apply the same process to the other pages.
* Clone the container down
* Attach it
* Navigate to both docs and images folder in file manager
* Open up docs directory in Pycharm
* Edit the page you request and include any images needed
* Push local changes
* SSH into container
* Navigate to docs directory
* Git pull and docsBuild
* View on live/browser