Restore Jira From Backup
The following page will go over how to create a Jira instance back up and how to restore it.
Creating a Backup
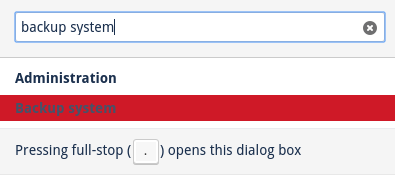
In Jira, press the full stop key, type in "Backup System" and click on the result.
You'll see that the page indicates where the back up is create. Make note of this as we'll need to access the directory later on.
Also, we'll have to backup any attachments in Jira manually.
First though, enter what you'd like the back up to be called in the following text field. Make sure you save it as a
.zip file.

Now click Backup.

The page will refresh and present a small message saying where the backup has been exported to.

As we saw earlier, we need to manually back up the attachments.
Head over to a fresh terminal and ssh into the container for the Jira you're backing up.
Do sshContainer admin-jira.
I'm using the Admin Jira for this example. To see which container you're after, do containerList in a fresh terminal window.
When you're in the container, do sudo bash to make yourself root and then ip a. This will display an ip that we
need to connect to in the file manager.
You'll see the terminal generate the following:

In the first block of text that begins with 1000 copy the sequence of 4 numbers as shown below.

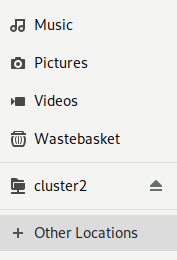
Now head over to your file manage and click on "Other Locations".
At the bottom of this window, you'll see a field that says "Enter server address...". In this field, enter the following:
ssh://ec@<THE NUMBER YOU COPIED>:9516/. Make sure you replace the <> as well.
When ready, hit "Connect".

Now, go to /home/ec. Keep this open as we'll need this directory later.
Head back to the terminal and do cd /var/atlassian/application-data/jira/data.
If you do ll you see the attachments folder in there.

To back this up, we need to copy it over to the /home/ec/ directory.
Do cp -r /var/atlassian/application-data/jira/data/attachments/ /home/ec/ to make a copy of the attachments folder
and place it in the /home/ec that you have open in the file explorer.
Now, we need to take the Jira back up generated earlier and copy it to the /home/ec/ directory like we did with the
attachments.
Using the directory we got from the Jira back up page, do cd /var/atlassian/application-data/jira/export/.
To check that we're in the right place, do ll. You should see the back up under the name you assigned it earlier on.

Now do cp Admin-Jira-Backup.zip/ /home/ec/ to move the back up to the home directory.
Again, going back to the file manager, you'll now see that both the attachments and the back up we made are here in the home directory.
